Perfect Motorcycle Pre-Delivery Inspection (PDI) Checklist
Today, we will discuss and outline the ultimate motorcycle PDI checklist, also known as the Pre-Delivery Inspection checklist, so that you can eliminate most of the manufacturing defects on your new motorcycle and relax.
For a rider, Motorcycling is love. The very day we take it to our home, we get into a relationship with it emotionally. The process starts with either a need or a passion. We go through a lot of reviews, ask friends, compare the specifications, or evaluate our riding style to choose the perfect motorcycle. Then we finally arrange money and book our dream.
From booking to taking final delivery is one of the most anxious periods in our life. On the final day, we become so excited that we do not even check if it has problems or not. Only a few days or weeks later, we start to identify issues like a dent in the fuel tank or scratches in the headlight, or encounter a strange noise from the engine. It happens with almost everyone, even I faced this too.
My motorcycle (Royal Enfield Thunderbird 350) had problems with the self-start and petrol leakage. Later, I had to replace the clutch switch and carburetor in the first service (2016). I had to pay Rs. 90 for the clutch switch, and Royal Enfield replaced the carburetor for free under warranty.
My only point here is, if I had been thoroughly checked during the delivery, I could have identified the problems on the very first day. In my case, the issue was small, but for you, it might be very big. Even if you go through the owner’s manual, specifically the warranty terms, you may notice that there are a lot of clauses where the warranty is not applicable.
To be on the safe side, you must always do PDI (Pre-Delivery Inspection) so that most of the manufacturing problems can be isolated.
P.S. This Motorcycle PDI Checklist below may become long but I can assure you it is comprehensive. Still, if you want a compact version, let me know in the comment section, and I will add a downloadable pdf checklist.
Two-Wheeler Basic and Cosmetics Checklist
You may be surprised, but on many occasions, a new motorcycle can have cosmetic faults like dents, color fading, poor welding joints, or scratches. Sometimes these faults are so minute that the showroom guy might ask you to wait till the first service when they will solve it. This happens because this motorcycle traveled a long way from the manufacturing site and was poorly handled all the way.
You might want to ignore cosmetic faults, although I would never suggest that. Never ignore faults in functional parts like the chassis, headlight, engine, etc.
Basically, you need to inspect your new motorcycle in good lighting thoroughly. Sometimes, even the side or main stand may have defects like uneven length, poor welding, or jamming.
- Check and note the engine & chassis serial number physically.
- Check for scratches or dents in the tank, handlebar ends, levers, chassis, engine, radiator, crash (leg) guards, and footpegs.
- Look for rust and welding joints in every metal part.
- Check for scratches or cracks in the visor, headlight, mirrors, switches, indicators, tail lights, or any other plastic/fiber parts.
- The handlebars should be free to move and not bent.
- If the motorcycle has a radiator, its fins should not have bends.
- Keep your motorcycle standing on both sides of the main stand and check for its stability.
- Your motorcycle seat should not have any cuts or be out of shape. If possible, ask them to remove the seat cover for inspection (note: some dealers do not provide seat covers).
- Check all screws & bolts for tightness, especially in the handlebars, engine, mudguard, exhaust, brakes, chains, etc. Also, check if any of those have rusted or are out of shape.
Motorcycle Engine, Brakes, and Transmission Checklist
Now you once you are done with cosmetic parts. Let’s move to the heart of the motorcycle, the Engine, Brakes, and Transmission section of the motorcycle PDI checklist.
- Check the Engine & brake oil levels, colors, and leakage.
- Whether the chain is lubed or not. Generally, a new motorcycle gets chain waxed.
- Look for gear shifting for smoothness and unwanted noise or slack.
- Check if there are any visible dents, scratches, or cracks near the Engine and transmission area.
- For a liquid-cooled motorcycle, check the coolant level and color.
Tire Thread and Pattern Checklist
A tire is one of the most important parts of a motorcycle because it surfaces the road and provides the necessary grip. Look at tire threads and patterns for defects, speed rating, and manufacturing date. A sealed tire may last for a long but if it is attached to a motorcycle, probably not.
- Check for correct air pressures
- Look for its threads, cuts, shape-shifting, stones, or even nails.
- Check the age of tires, too old may not last long.
- Sometimes dealers change the tire, so verify with the owner’s manuals for its size and thread pattern.
Electrical and Electronics Checklist
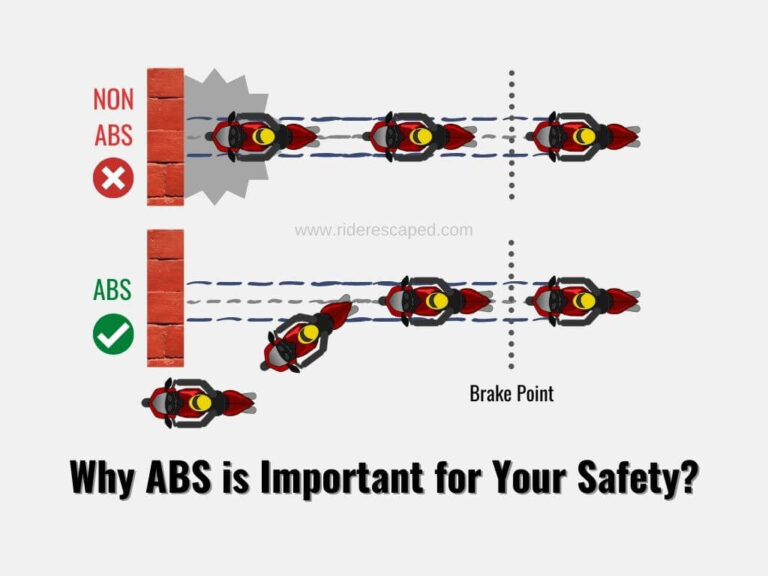
These days, almost every motorcycle has a lot of electronics and electrical parts other than basic lights/indicators. Even a few electronic features like ABS, Traction Control, Side Stand sensor, and Fuel Injection are so important that without these, probably your motorcycle will never start.
- Turn on headlights, indicators, auxiliary light (if applicable), tail lights, and check.
- Switch on the motorcycle and look for the lights blinking on the console. If needed, start the motorcycle and check if everything is normal.
- Engage the side stand (applicable for side stand indicators only), and honk to check battery health.
- Ask them to open the battery panel and check for battery specs and leakage.
Motorcycle Accessories Checklist
Check all the accessories you must get with a motorcycle, like the main stand, saree guard, mirror,and crash (leg) guard (optional, depends on the brand and specific motorcycle).
Sometimes you may get freebies like a helmet, seat cover, keyring, chain lube/cleaner, motorcycle cover, etc.
Finally, Test Ride the Motorcycle
It is the most important section in the motorcycle PDI checklist where you will check and learn about your new motorcycle more.
- Start your motorcycle and notice if it sounds any different. Do the same with continuous and gentle throttle blipping. Also, look for ticking tappet noise.
- Check if white smoke is coming out of the exhaust.
- Self-start the motorcycle a couple of times to check battery health.
- Put the motorcycle in the main stand, give a light throttle in first gear, and check for tire wobbling or jamming or if the brakes are okay. Sometimes new brake pads may resist the wheel’s free rotation, look for that too.
- Check all the electronics and electricals thoroughly; the console indicators should be normal.
- Before you take a test ride of your motorcycle, check if the engine is struggling at low RPM (idling).
Now you should take at least a 1-2 kilometer long test ride to find out if everything is fine or not.
Motorcycle Papers and Documents Checklist
Let’s come to one of the most important points, papers and documents. First of all, you must know what documents your motorcycle should have, then we will discuss what documents you will get and when. Below are the required and must-have documents for a motorcycle
- Registration Certificate
- Tax token/Certificate
- Insurance (Mandatory 5 years of insurance)
- Pollution
- Number Plate
- Bill or Invoice of purchase
While you need to carry the first five documents all the time and the last one is for your proof, or if you want to sell the motorcycle later.
Please keep in mind, during delivery, you will only get the Insurance policy papers (Validity- 5 Years as per the latest Indian Government rules) and the Invoice. By default, any new vehicle has a non-pollution declaration sticker attached, but in many cities, police don’t consider that valid.
So, it is advisable not to take your motorcycle out before getting the number plate, Tax Token, PUC (Pollution Under Control Certificate), and RC (Registration Certificate).
In general, the number plate takes about 7-15 days, and the rest, like tax token & RC, may take up to 30 days. Keep in touch with the dealer or showroom guy to be updated. Once receive all the required documents, get yourself a PUC certificate.
Conclusion on Motorcycle PDI Checklist
Finally, I would say, taking a dream bike home is not easy at all. Starting from deciding the budget, selecting the perfect motorcycle, arranging money for it, so be sure you are taking your new motorcycle only not any problems.
Hope you find this motorcycle PDI checklist helpful. If yes or even otherwise, let us know in the comment section.
Follow Us
Until we published another useful content, you may consider to subscribe to Rider Escaped Newsletter and connect with us on Social platforms to get future updates quicker.
Don’t forget to check out our other Motorcycle related information.
Certainly, if you loved the content, share this with your buddies. Also, if I missed out on anything, do let me know in the comments section. I will include it in the post.
Sharing is Caring
Thanks! Have a great day ahead.